
Before making flowcharts, we must first understand what they are. In simple terms, flowchart or flow chart, is a type of diagram that describe processes. These diagrams compose of symbols, often rectangular, connected by arrows. Read on to learn more about how to create a flowchart from scratch, using pen & paper, or specialized flowchart tools.

This complete guide on building a flowchart helps one gradually develop even the most complex flowcharts from scratch. There are five steps to building a flowchart. From determining the diagram's purpose and the components, drawing the basic shapes, and reviewing the chart, these basic steps should be conducted.
Below are 5 easy steps you can follow to make a flowchart from scratch. To further improve your flowcharting skills, here are the Tips You Must Know To Create Better Flowcharts.
For visualizing abstract processes, it is necessary to determine the purpose of the flowchart. This helps in choosing the suitable types of process maps to build.
Designers can employ one of the following main flow chart types:
1. Process Flowchart: As the most common type, a process flowchart illustrates the steps of plans, projects, production processes, etc. It visualizes and explains how something is done from start to end so that teammates, managers, an external team, and other viewers understand business processes.
2. Workflow Chart: These organizational charts indicate the flow of materials and data in an organization. It works wonders in training newbies, identifying problems in the workflow, planning new procedures, or explaining business operations.
3. Swimlane Flowchart: The purpose of this graphical representation is to clarify the interaction process between different employees, departments, and processes, such as sales process steps that involve other parts of a business. Each diagram can consist of six or more swimlanes.
4. Data Flowchart: It explains the input-output flows in an information system. A data flowchart comes in handy when one needs to analyze a plan or design a new one. Process maps are the most common in software development but can also be used in business processes.
This step involves listing out all the phases and assigning the proper shapes to each of them.
Different process maps comprise varied components, depending on their type, purpose, and content. The following are some of the most popular elements used in basic process mapping:
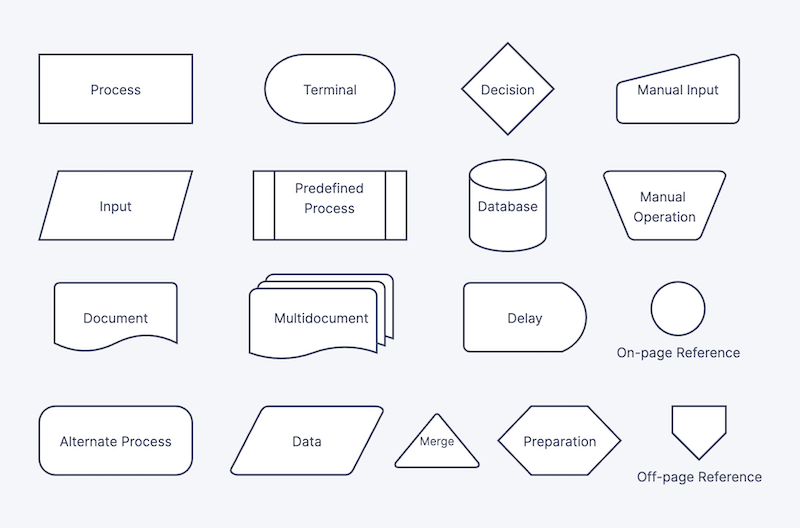
- Start/End: A pod shape or oval shape.
- Action: A rectangle.
- Document: A rectangle featuring a rippled bottom.
- Multiple documents: A symbol showing three accumulated rectangles with rippled bottoms.
- Decision: Diamond shape.
- Input/Output: A parallelogram.
- Preparation: A hexagon.
- Data storage: A pod shape with two parallel curves on the sides.
- Manual input: A rectangle with an angled top side.
- Connector: A circle.
- Or: A circle with a cross inside.
- Summoning junction: A circle with an X symbol inside.
- Merge: A triangle with one apex pointing down.
- Collate: Two triangles resembling a sand clock.
- Manual operation: A trapezoid shape.
Now that all the components have been visualized, the next step is to place the steps in the correct order to sketch out the basic process map.
In addition, the diagram maker needs to add lines and arrows to illustrate the direction of flow and the relations between critical elements.
Although the entire process is close to finishing, there may be changes in this process step, such as alternating the step order and adding components. Also, remember to use keywords and phrases only, do not write an entire sentence in each box.
Once all the flow lines and terminal symbols are added, you now have a complete flowchart, ready for review.
After a series of steps, the flowchart has already come to life with the complete flow, actions, and components. However, a thorough review is essential to spot errors and improve the process flowchart.
An excellent way to assess the flowchart is to get help from people unfamiliar with the process. Ask them to view the diagram and determine whether they understand what it is supposed to convey.
The flowchart maker can develop possible solutions to achieve a practical process map based on the viewer's responses. Gather everyone's feedback and make improvements to your flow chart accordingly.

Flowcharts should be made easily accessible to all parties involved. So make sure you publish your work in the right place.
Our online flowchart maker Zen Flowchart has a handy publishing feature, which allows you to publish and share your flowcharts. Any future updates you make to the document will automatically be updated.
As you create documents within Word, Powerpoint, or Google Docs, you can create flowcharts easily using the features these tools already provide. Read our specific guide for each app to learn more:
You can create flowcharts easily with just pen and paper. But online flowchart tools will make this task so much easier as there are already pre-made flowchart components that you only need to drag & drop into your workspace. Furthermore, flowchart tools can help you publish and share your documents easily to colleagues and clients.
Here are the Top 10 Flowchart Software we recommend.
If you need some more guidance to get started. Check out some of our ready-made flowchart templates that you can duplicate.
